

Our very own cloud consultant Hugo van Duijn has been working on an exciting PostgreSQL migration project for Cowboy. In this blog he shares his learnings, tips and tricks with you.
Migrating large databases with minimal downtime, CloudNation Knows How.
Migrating a postgres database with minimal downtime using Bucardo
Managed PostgreSQL from Heroku might be a good choice for hosting a Postgres database in a lot of use cases. The solution is available in specific plans and does not offer much flexibility in scaling. Amount of connections, CPU, memory and disk space are bound to specific plans which might not be optimal for your database resulting in paying a high fee for resources you don’t need. This is even more the case if the database reaches over 1TB.
Also even the most expensive plan (currently with 768GB memory) does not offer more than 500 connections, which might not be sufficient. RDS allows up to 65536 connections for instances with 768GB memory. Besides these concerns there might be use cases where you want to make use of streaming replication or more detailed metrics offered by performance insights of AWS RDS.
When you want to migrate from Heroku PostgreSQL you will find out that this is rather easy, basically create fork of the database since dumps from the running database have a bandwidth limit of 10MB/s, dump data from fork and restore this data into RDS. Job done. This method is advised but you would have to accept that all changes from the moment the fork is created until the migration is complete are lost. In most cases this is not acceptable.
Migrating without losing these changes means you will have to set up some kind of replication from the source to the destination database, since you don’t get superuser permissions on the managed service the options are limited, AWS DMS can’t be used. A common practice is to request Heroku Data Support team to establish continuous WAL log shipping to an AWS S3 bucket along with a base physical backup using the wal-g or wal-e format. A log shipping replica (LSR) can then be configured inside an EC2 instance. When configured the LSR can be promoted and used as source for migration to RDS, Using either logical replication or AWS DMS. There is however a catch with this solution. This basically is not supported by Heroku anymore, they might do this as a one-off event for enterprise customers but basically the only offer this service as a Heroku Streaming Data Connector which is only available when using Private Spaces and not within the Common Runtime environment.
Basically the only option remaining is to setup replication using triggers in the source database. The best known tools that offer this are Bucado, Londiste, Mimeo and Slony. Mimeo seems to have no more active development, Londiste seems to have some development but lacks in documentation. Slony seemed a good contender which in theory should have the best speed of all tools but documentation is minimal and setup is rather complex, getting the task done was more important than speed so we chose to use Bucardo for migrating a 1.5TB postgres 11.14 database with minimal downtime.
Step 1: Prepare environment and install Bucardo
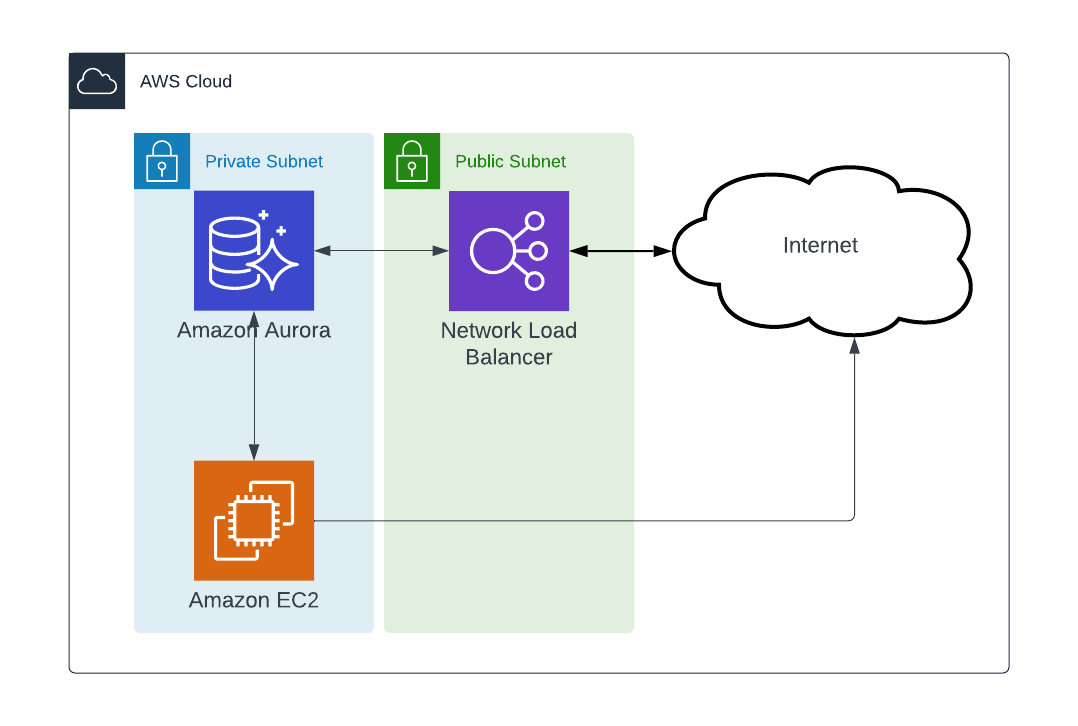
To prepare the environment we will need to setup a few things in AWS, enabling public access for the RDS is not a best practice, RDS should be created within a private subnet using a multi-tiered architecture. Create the architecture according your needs, in this case the private subnet consists of the EC2 instance and Aurora RDS. Public access for RDS was needed for apps running in Heroku common spaces so this is done using a AWS Elastic Network Loadbalancer. If you use Heroku Private Spaces then a possibility for a peering gateway might be a much better choice. Also placing the EC2 in a private subnet requires some addition configuration to be able to SSH into the instance. AWS Session manager may be used.
EC2 instance
Bucardo does not have very high system requirements, we did however also use the instance for creating dumps and restores of the initial database so disk space should be able to hold the compressed dump of the database and some CPU might help speed up dumps and restores. A m6i.4xlarge was used with 1.5TB datadisk which was more than sufficient to handle the tasks needed.
Amazon Linux 2 with kernel 5.x was selected as AMI.
Configure data disk
find out device using sudo lsblk
if disk is /dev/nvme1n1
sudo mkfs -t xfs /dev/nvme1n1
sudo blkid   # Copy UUID in clipboard
sudo vim /etc/fstab
Add new line, paste correct UUID from clipboard :
UUID=d5af2c4f-b593-4fcf-a449-b1016a36e05a /database xfs defaults,nofail 0 2
mount database
sudo mount /database
sudo chown -R postgres:postgres /database
sudo chmod -R 700 /database
Installation postgres11.4:
sudo yum install python3 lzop pv -y
sudo yum install -y https://download.postgresql.org/pub/repos/yum/11/redhat/rhel-7-x86_64/postgresql11-libs-11.14-1PGDG.rhel7.x86_64.rpm
sudo yum install -y https://download.postgresql.org/pub/repos/yum/11/redhat/rhel-7-x86_64/postgresql11-11.14-1PGDG.rhel7.x86_64.rpm
sudo yum install -y https://download.postgresql.org/pub/repos/yum/11/redhat/rhel-7-x86_64/postgresql11-server-11.14-1PGDG.rhel7.x86_64.rpm
sudo yum install -y https://download.postgresql.org/pub/repos/yum/11/redhat/rhel-7-x86_64/postgresql11-contrib-11.14-1PGDG.rhel7.x86_64.rpm
Initialize database and edit systemd
sudo su postgres
/usr/pgsql-11/bin/initdb -D /database
exit
/usr/pgsql-11/bin/initdb -D /database
exit
sudo vim /usr/lib/systemd/system/postgresql-11.service
start database using sudo systemctl start postgresql-11
Install Bucardo and dependencies
dependencies:
sudo yum install -y https://download.postgresql.org/pub/repos/yum/11/redhat/rhel-7-x86_64/postgresql11-plperl-11.14-1PGDG.rhel7.x86_64.rpm
sudo yum install perl-DBIx-Safe perl-devel perl-Pod-Parser perl-Sys-Syslog
Bucardo:
sudo -s
cd /opt
wget https://bucardo.org/downloads/Bucardo-5.6.0.tar.gz
tar xvfz Bucardo-5.6.0.tar.gz
cd Bucardo-5.6.0
perl Makefile.PL
make
make install
Create Bucardo database
sudo su postgres
psql
CREATE USER bucardo WITH LOGIN SUPERUSER ENCRYPTED PASSWORD 'bucardo';
create database bucardo;
alter database bucardo owner to bucardo;
exit;
Install Bucardo
/usr/local/bin/bucardo install
This will install the bucardo database into an existing Postgres cluster.
Postgres must have been compiled with Perl support,
and you must connect as a superuser
We will create a new superuser named 'bucardo',
and make it the owner of a new database named 'bucardo'Current connection settings:
1. Host: localhost
2. Port: 5432
3. User: bucardo
4. Database: bucardo
5. PID directory: /var/run/bucardo
Configure Bucardo
Add source and destination DB’s. Add configuration for source and destination databases and place in dbgroup named: grp1, then add all tables and sequences and add those to the relgroup named : syncgroup. Finally add a sync named dbsync with links to the relgroup and dbs.
Getting database credentials from Heroku can be done using heroku pg:info -a <app-name>
Database URL should be shown there, example: === DATABASE_URL, HEROKU_POSTGRESQL_IVORY_URL
using a bash run you can the connection string
heroku run bash -a <app>
echo $HEROKU_POSTGRESQL_IVORY_URL
Connection string format is : postgresql://[user[:password]@][netloc][:port][/dbname]
bucardo add db source_db dbhost=<source host address> dbport=5432 dbname=<source dbname> dbuser=<source dbuser> dbpass=<source dbpass>
bucardo add db dest_db dbhost=<dest host address> dbport=5432 dbname=<dest dbname> dbuser=<dest dbuser> dbpass=<dest dbpass>
bucardo add dbgroup grp1 source_db:source dest_db:target
bucardo add all tables
bucardo add all sequences
bucardo add tables --relgroup=syncgroup --verbose
bucardo add sequences --relgroup=syncgroup --verbose
bucardo add sync dbsync relgroup=syncgroup dbs=grp1
bucardo validate dbsync
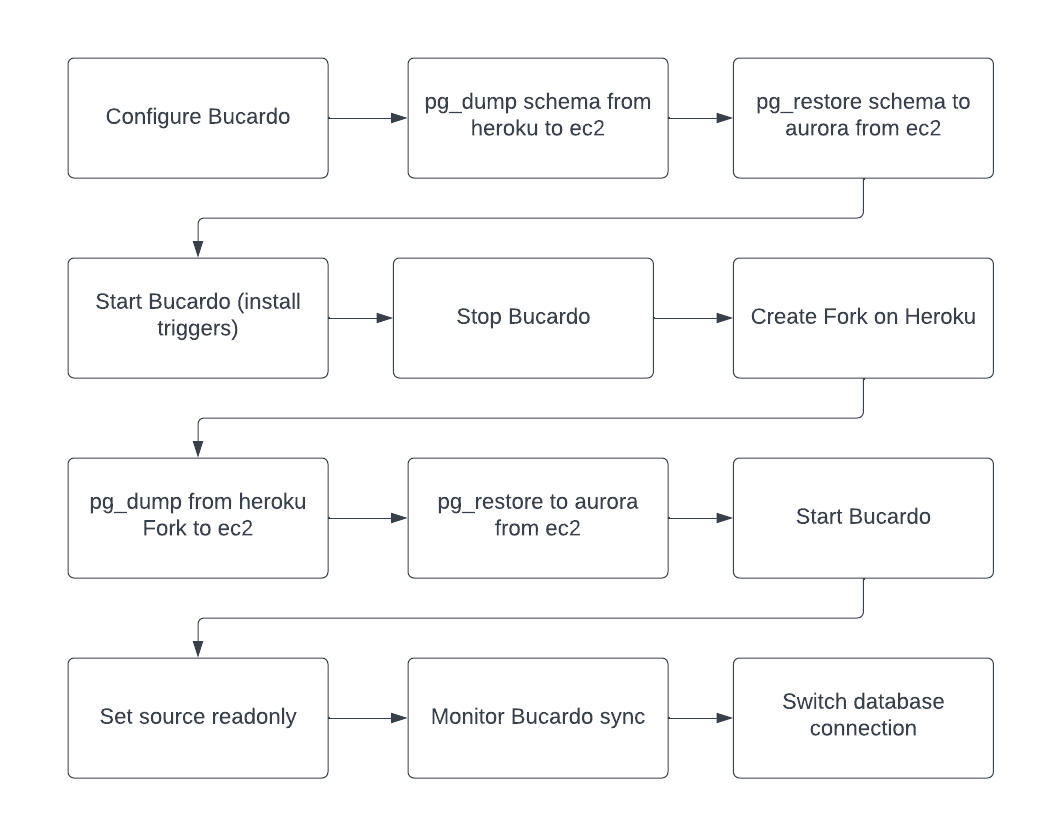
pg_dump schema from Heroku to ec2 and restore into Aurora RDS
Get the connection string of the source database and run pg_dump command to dump the schema only and exclude any triggers and restore using psql. You might need to create the database in aurora RDS first.
pg_dump postgres://<user>:<password>@ec2-54-200-208-94.eu-west-1.compute.amazonaws.com:5433/<dbname> --schema-only | grep -v 'CREATE TRIGGER' | grep -v '^--' | grep -v '^$' | grep -v '^SET' | grep -v 'OWNER TO' > schema.sql
psql postgres://clusteradmin:<rds password>@<aurora rds endpoint>:5432/postgres -f schema.sql
Start Bucardo (install triggers)
WARNING this might make a "live" system unresponsive for some time due to the requirement of having exclusive locks on all tables. Deadlock errors may occur but bucardo schema and delta tables should be created in the source database.
It might be a good practice to reduce the amount of locks as much as possible by temporarily stopping workers or blocking access to the database. When done run bucardo start to start creation of tables and initiate sync to RDS. If the database is rather small or you don’t mind running Bucardo for a long time then you can just wait for the sync to complete, a rough estimation will be around 24hours per TB data. In our use case we didn’t want the sync to run that long so performed a bucardo stop to stop active replication.
Create Fork on Heroku
Since we want to create a dump of the complete database we need to create a fork first due to bandwidth restrictions to the main database. After creating a fork run the g heroku pg:info -a <app-name> to find out the connection string variable of the fork and retrieve the connection string using the method described above.
pg_dump and pg_restore
Create a compressed dump in directory format with 8 parallel jobs. Parallel jobs make sense if there are multiple large tables, one job per table is the maximum if there is only 1 very big table in the database then running multiple jobs makes no sense. Compression CPU usage is usually the bottle neck, disabling compression may speed things up in some use cases. Make sure you run this command in a screen sessions for example screen -DR migration this way the dump does not stop when SSH access in interrupted. Run the same command to reattach to the screen.
time pg_dump -j 8 -Fd -f /database/dbdump <source connection string> > dump.log 2>&1
Make sure that you use the RDS endpoint for the restore and not the NLB endpoint. The NLB endpoint works great for short duration connections to the database but will drop very long running connections like pg_restores.
time pg_restore -C -Fd -d postgres -j 8 /database/dbdump -W -U clusteradmin -h <RDS endpoint> > restore.log 2>&1>
Make sure you verify the logs to see if the dumps and restores are ok.
NOTE Roles are not dumped and restore will result in missing roles messages, you will have to create the roles before restore or recreate after restore. Also the size of the database will be much smaller in most cases since dump and restore can be compared to a VACUUM FULL action.
Start Bucardo
If restore is completed then Bucardo can be restarted, this will then initiate a scan of the source and destination to see which records still need to be synced and sync the records. bucardo status should show the status of the synchronization. Be aware of possible deadlocks when starting Bucardo.
bucardo status dbsync should return some more details.
bucardo status dbsync
======================================================================
Last good : Mar 03, 2022 07:47:32 (time to run: 7m 37s)
Rows deleted/inserted : 10,753 / 338,773
Sync name : dbsync
Current state : Copying from source_db.public.sometable
Source relgroup/database : syncgroup / source_db
Tables in sync : 74
Status : Active
Check time : None
Overdue time : 00:00:00
Expired time : 00:00:00
Stayalive/Kidsalive : Yes / Yes
Rebuild index : No
Autokick : Yes
Onetimecopy : No
Post-copy analyze : Yes
Last error: :
======================================================================
in some cases the status can show:
bucardo status dbsync
======================================================================
Last good : Mar 02, 2022 11:02:24 (time to run: 1m 11s)
Rows deleted/inserted : 44,000 / 123,000
Last bad : Mar 03, 2022 23:16:43 (time until fail: 1h 44m 45s)
Sync name : dbsync
Current state : Good
Source relgroup/database : syncgroup / source_db
Tables in sync : 74
Status : Active
Check time : None
Overdue time : 00:00:00
Expired time : 00:00:00
Stayalive/Kidsalive : Yes / Yes
Rebuild index : No
Autokick : Yes
Onetimecopy : No
Post-copy analyze : Yes
Last error: : Failed : CTL request Line: 4997 (KID 4233)
======================================================================
There are possible locks within the database restricting progress, this issue should resolve itself within a couple of hours.
Set source readonly and monitor Bucardo sync
It will be necessary to make sure no inserts of deletions are done in the source so Bucardo can sync the databases. When the status shows: Rows deleted/inserted : 0 / 0 you are ready to make the switch. You might consider to do one manual kick to make sure everything is synced. bucardo kick dbsync, normally the sync will get kicked whenever there is a change on the underlaying tables so this shouldn’t be necessary but if this automated kick does not work as designed then a manual kick will make sure the tables are being synced.
Switch database connection
Set the endpoint to the NLB endpoint of aurora RDS. Migration complete.
Step 3: Clean up
Triggers and Bucardo schema will now exist in the Aurora RDS database and might impact performance since they create locks on tables. Cleaning up asap might be preferred. This can be done by removing the triggers using a psql connection to the aurora rds or nlb endpoint.
psql <rds aurora endpoint>
psql> \o drop_triggers.sql
psql> select format('DROP TRIGGER %I ON %I;', tgname, tgrelid::regclass) from pg_trigger where tgname like 'bucardo_%'
psql> \q
# you might want to review the drop_triggers.sql file:
cat drop_triggers.sql
psql <rds aurora endpoint>
psql> \i drop_triggers.sql
psql> DROP SCHEMA bucardo CASCADE;
Helpful commands and tips
-
Show triggers in database using psql:
SELECT tgname
FROM pg_trigger where tgname like 'bucardo_%';-
Adding extra tables or sequences or adding syncs to Bucardo will not be active unless Bucardo will be stopped and started. Stopping and starting might result in error Failed : CTL request Line: 4997 (KID 4233). This should be resolved automatically but may take a few hours. It is advised to sync all sequences and tables instead of starting with a limited set and extending later.
-
You might find instructions telling to use this procedure:
> bucardo add sync load_events_sync relgroup=load_events dbs=cargotel_sync,metro_sync type=pushdelta status=inactive
> pg_dump & pg_restore
> bucardo update sync load_events_sync status=active
this will however not work with newer versions >5.4.0 of Bucardo due to a complete rewrite of the pushdelta code within Bucardo.
-
An easy and quick method of finding out sync is working is to sort descending an indexed primary key of a table and compare difference on source and destination. Ofcourse there are also a lot of other methods of comparing, like count functions. Also don’t forget to test the application against the NLB endpoint to make sure the connection works as intended and roles have been setup correctly.
-
Aurora RDS might incur higher costs if there are a lot of read and write IOPS. I would still suggest to migrate to Aurora RDS instead of RDS because of the advantages the data layer offers but it is good to know that AWS DMS can help migrating from Aurora RDS to RDS without downtime so starting out with RDS Aurora is a rather safe bet.
-
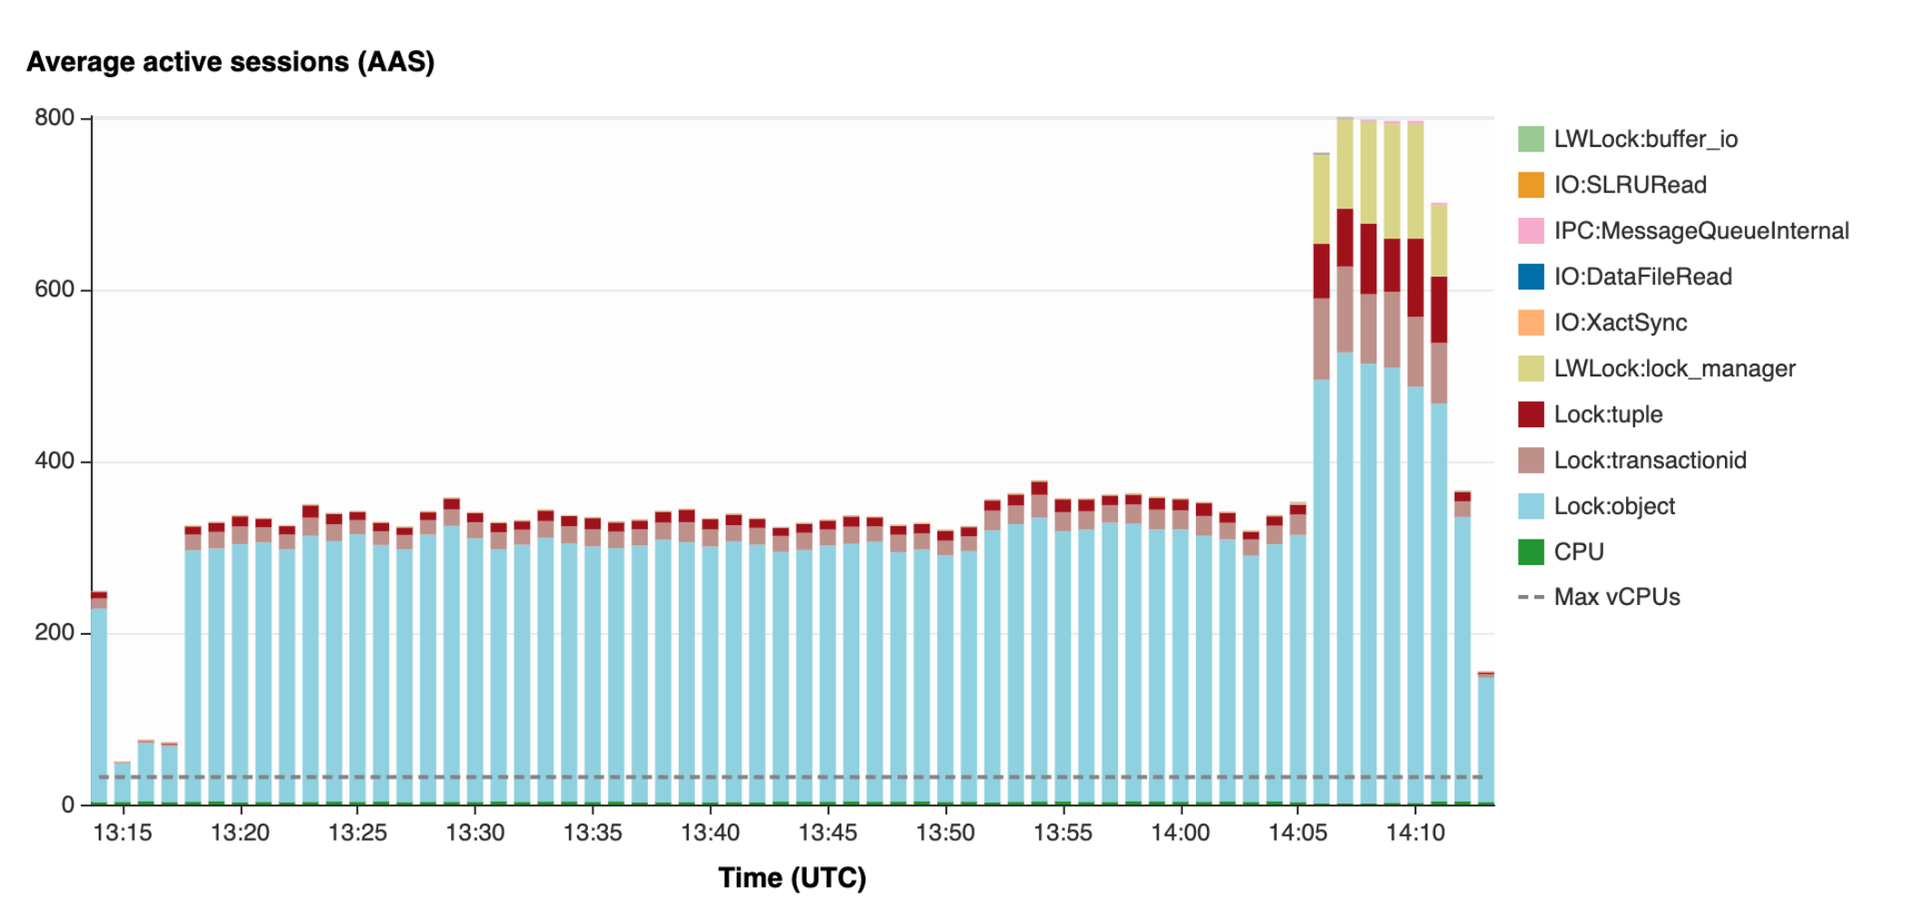
Adding multiple parallel workers inserting data into tables can result in high lock:tuple which effects performance. This is caused by the triggers of Bucardo which create locks on the tables. Limit parallel workers and cleanup all Bucardo related triggers asap is the best advise. You can find the metric with Lock:tuple shown in the screenshot below using performance insights from AWS RDS Management, select your database and the metric will be visible under : Database Load
If you have any questions about the above or would like to talk cloud with us, feel free to get in touch! We will take care of the coffee.